Christmas is now just a few days away, so in this festival season I will show you how quickly make a Christmas light bulb in Adobe Illustrator. So lets move on to make it & decorate it with snowflakes & seasonal shininess!!
Step 1
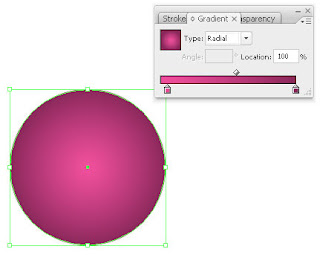
Select the Ellipse Tool (L), hold down shift & draw a circle & fill it with radial gradient, without stroke, you can choose any colors of your choice or follow along with me: for the first slider I chose, R(237)G(78)B(155) & for the second, R(138)G(40)B(90)

Step 2
Now, again with the Ellipse Tool(L) draw a oval with the Black & White linear gradient fill with no stroke as shown in the image below.
Step 3
Select the oval we drew in step 2, & change its Blending Mode (in the Transparency Palette) to Screen & bring it over the circle we drew in step 1.
Step 4
Next, with the Rectangle Tool(M) draw a small rectangle of about 29 by 19 pixels & fill it with 4 slider linear gradient as shown in the image below. For the 1st slider, I chose R(237)G(78)B(155), for 2nd R(255)G(255)B(255), for 3rd same as 1st & for 4th R(82)G(40)B(90).
Step 5
Now, place the rectangle exactly over the top center of the circle & drag the bottom 2 points of the rectangle a bit in the outward direction with the Direct Selection Tool(A).
After that, select the rectangle if it is not already selected & right click over it & select Arrange>Send to Back.
Step 6
Draw a small circle approx. of 21 by 21px with Ellipse Tool having no fill & the stroke color, R-82 G-40 B-90. Now, with the circle selected click on the double click on the Scale Tool(S) & in the dialogue box, scale the size of the circle to 90% & hit copy. And, change the color of the inner/smaller circle to, R-237 G-78 B-155, which is no fill & only stroke.
Now, you should have some thing like the image below. You can also group both the circle.
Step 7
Select & place the rings in the center point of the rectangle we made in step 5. Right click on the rings & select Arrange>Sent to Back.
Step 8
Now, what we need is a string over the rings to hold our bulb, right? For that you can make your own pattern brush which is not a difficult task but since we want to make a light bulb very quickly as Christmas is approaching fast, we will download a nice bead brush from here . Load the brush in your Brush Palette. Now with the Line Tool draw a straight line (holding down shift key) above your rings, as shown in the image below. The color of my line is, R-237 G-78 B-155.
Step 9
With the line still selected, click on the brush named, Marble String from the brushes that we have downloaded in step 8.
From the Stroke Palette reduce the Weight of the brush to 0.15pt or anything that suits the bulb you're making. With the same brush you can also make one more such string. Your, light bulb should now look like this:
Step 10
Now, we're almost done, but we want to decorate the bulb a bit! For this we will need some snowflakes, you can download snowflakes brushes from here or from Adobe Exchange. Next, select the circle that we made in Step 1, go to Edit>Copy & then, Edit>Paste in Front.
Step 11
After that, load the snowflakes brush in your Brush Palette & with the Brush Tool(B), click anywhere on your art board to have a snowflake. Select the snowflake & go to, Object>Expand Appearance to turn your snowflake brush stroke into a shape.
Also, for the purpose of cleanliness, with your snowflake selected, goto Object>Path>Clean Up to remove all the stray/unwanted points & paths. Also, change the stroke to none, we need only fills.
Step 12
Finally, place the snowflake over the circle, if it is too small you can scale its size, you can also select, Effect>Warp>Arc to bend it slightly.Then, with the snowflake still selected, hold down shift key & select, one of the circle that we duplicated in Step 10.
Next, with both the shapes selected, hold down Alt key & hit Intersect Shape Area button in Pathfinder Palette to remove the unwanted parts of snowflake.
And, that should be it! Your light bulb is ready! I also changed the fill color of snowflake to white & reduced its opacity to 50%.
So now, I am sure you can also make a fancy greeting card like I made this. For this, I made more snowflakes than one and grouped them all & rest of the process remains the same as explained in Step 12 above.
Hope you enjoyed this tutorial & if you have any questions/confusions, feel free to ask!


No comments:
Post a Comment