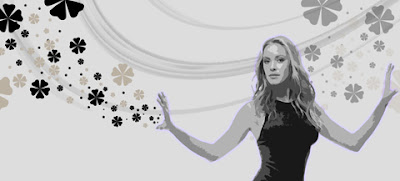
Design a cool floral wallpaper from scratch with our tutorial.
First Download the Brush (attachment)
Begin by creating a new file (File>New) that would have 1024x768 px and 72 dpi and apply on the new file the Paint Bucket Tool(G)to represent it in this color #DDDDDD
Find in Internet a girl's picture: (OR use your Own Picture) Cut it out:
Make the girl's layer look black and white (pressing CTRL+SHIFT+U)
Apply for this layer the next filter's option: Filter>Filter Gallery>Cutout, and use it also on the earlier made background.
Make a copy of the new made layer, applying for the copy the filter's option shown here: Filter>Distort>Twirl Hide for a while the first layer containing the girl on the layers' panel.
 Select now the Free Transform option to turn over the layer, changing the sizes and pacing it the way you may see the next picture.
Change also the layer's parameters: Fill 20% Make a copy of the last made layer and select one more time the Free Transform option to turn the copy over and place it the way it is indicated below:
 Make visible again the earlier hidden layer with the girl which is placed upper than the earlier described layers (on the layers' panel).
 Apply for this layer the next parameter: Blending Options>Outer Glow

Select now the Custom Shape Tool (U) to picture a flower, colored with #BBB1A3

 Make 26 copies of the last made layer and use again the Free Transform selection to change the copies' sizes the way it is shown next picture.
Make one more copy of the flower's layer, changing the copy's color on black.
Try to make now many copies of the black flower, having different sizes (using the Free Transform option for this operation).
Make the same way several more copies of the flower that would be situated on the right side of the picture. The copies should be placed lower than the girl's layer (on the layers' panel).
Combine in a group all the layers containing the flower's copies from the picture's right side (press on Ctrl button to mark out the necessary layers and make a click on the left mouse's button to take the marked layers on Create a new group option). Apply for this group a new parameter: Opacity 30%
Now we have to download out of Internet a set of ready to use brushes for Adobe Photoshop: patterns2
All the indicated below brushes' layers should be placed lower than the girl's layer.
Create a new layer and select on it the brush mentioned next: patterns2.
The color in this case should be: #8A9882

The layer's parameters: Fill 50% Make a copy of the last made layer and use the Free Transform option to move a little the copy to other side.
 Create a new layer again and select the patterns2 brush of white color.


Select now out of the same set a new brush having the white color. (Create new layer)


It's time to create another layer (Create new layer) and use on it the same brush: patterns2, having the color #2C7C76
 Change the layer's parameters: Fill 70%
Another new layer should be created. Use the same brush out of the same set, but this time of this color: #AF5CAE


Apply the indicated below layer's parameters: Fill 30%

Enjoying it, Give comments or your opinion.
25 December 2008
Custom Floral Wallpaper
Subscribe to:
Post Comments (Atom)


No comments:
Post a Comment