Introduction
Most people love to apply fancy effects to text. This tutorial introduces some quite simple but effective effects you can use not only with text but with other objects as well.
These effects can be applied using any version of Corel Photo-Paint from version 8 upwards, and possibly even earlier versions with some modification. At the time of writing, I am now using version 10 all the time now and as I wanted to make these tuts available fairly quickly, I haven't spent a great deal of time referring back to version 8 (sorry) and so there may be some minor changes for version 8 users that I have missed.Why do we need these effects?
In some cases similar effects exist under the effects menu in Photo-Paint but these are limited in scope and cannot natively provide the same depth of variation and control as those described here.
For instance, the Emboss Effect (under the 3D Effects submenu item in versions 9 and 10) only creates very harsh embosses. We sometimes need a much softer effect as shown here. Even if we apply a slight blur to the native emboss, we cannot achieve the same result with some soft and some hard edges.
 |  |  |
| Standard Emboss Effect | Std. Emboss Effect with Gaussian Blur applied | Std. Emboss with our soft emboss effect applied |
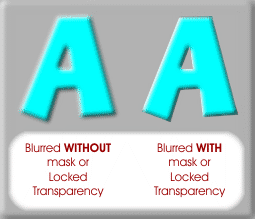
However, even using this simple blur method, we CAN achieve a hard edged result using either lock transparency or masks (see Part 1A next).
This method utilities Photo-Paint's Lock Transparency function, or masks to create text or object with soft emboss highlights and shadows.
Steps:
| 1. Create a new image. The Create a New Image dialogue opens.
| 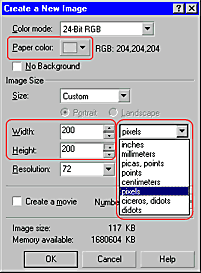 |
2. Change the Paint colour to cyan. If the colour palette is not present in the Workspace, open it using Window > Color Palettes > Default RGB Palette. |
|
| 3. Create a letter ‘A' object.
| |
| 4. Align the ‘A' object to the centre of the image. From the menu choose Object > Arrange > Align and Distribute. Choose ‘To Center of Document' then press OK. The Character is now centred to the image. | 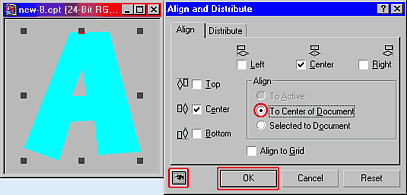 |
| 5. Apply the Emboss Effect (Effects > 3D Effects > Emboss).
Press OK. |  |
6A. (Lock Transparency method).
Ensure that the ‘A' object is still selected.
Press the Lock Transparency button. ![]()
- In PP 9 and 10 this button is located on the bottom of the Objects Docker and also on the Mask/Object Toolbar.

The Mask/Object Toolbar
- In PP8 it is a checkbox on the top of the Objects Docker and also as a button on the Mask/Object Toolbar.
Or...
6B. (Mask method).
Create a mask from the ‘A' Object. ( Mask > Create from Object/s, CTRL+M, or click the ![]() icon in the Mask/Object Toolbar.
icon in the Mask/Object Toolbar.
If the mask marquee is visible ( Mask > Marquee Visible, CTRL+H, or ![]() ) you will see a moving dotted line surrounding the ‘A' object. The visible mask marquee is sometimes described 'marching ants" !
) you will see a moving dotted line surrounding the ‘A' object. The visible mask marquee is sometimes described 'marching ants" !
| Both methods continued...
| |
| 7. Apply a Gaussian blur ( Effects > Blur > Gaussian Blur ).
The image opposite shows the difference between simply blurring the object without constraints and the effect obtained when the limit of the blur is constrained using either a mask or the Lock Transparency function.
|  |
|
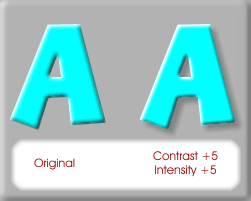
| If you like, you can enhance the effect even further through lightening the highlight more ( Image > Adjust > Brightness-Contrast-Intensity (B = 0, C = 5 to 8, I = 5 to 8), and add a light drop shadow |
8. Create 2 new objects.
9. Change the names of the new objects. Change the name for the first new object to "white" then click OK. Double-click the second new object and change its name to "black" as shown. | 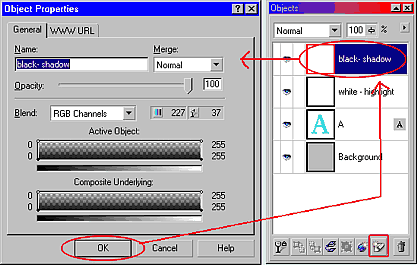 |
| 10. Create a mask from the ‘A' object.
| 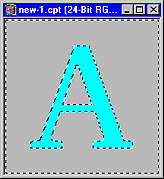 The mask shown here is inverted (step 8). |
| 11. Invert the mask. Mask > Invert, CTRL+SHIFT+I, or press the Now we need to fill shaped areas in the two new (white and black) objects we created in step 5. The filled shapes will be the inverse of the ‘A' character. | |
| |
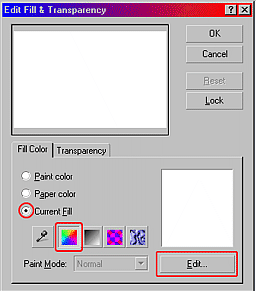
| 12. Fill the white object with white using the inverted mask shape. From the menu choose Edit > Fill. The Edit Fill and Transparency dialogue opens. Ensure the ‘Current Fill' radio button is selected and that the fill type is ‘Uniform Fill' ( the red, green and blue icon near the eyedropper).
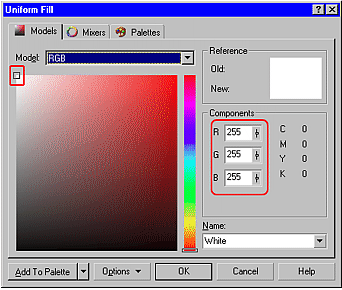
If the colour in the large colour swatch in this dialogue is not white, we need to change it to white. Click the EDIT button. The Uniform Fill dialogue opens. Drag the tiny square in the large gradient colour box right up to the far top left until the readings in the R,G and B value boxes read 255 each. This is pure white (RGB mode). Click OK and then OK again in the Edit Fill and Transparency dialogue. The ‘white - highlight object now contains a white ‘A'. Even though you can't see it in the Objects Docker, your image should now show a white ‘A'. |
|
| 13. Fill the black object with black using the inverted mask shape. After pressing OK twice you should see a black ‘A' in both your image and in the ‘black' object in the Objects Docker. | 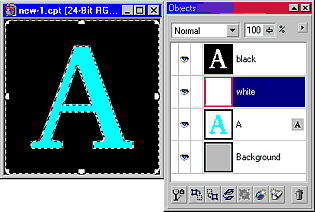 |
| 14. Remove the mask ( Mask > Remove, CTRL+SHIFT+R , or click the | |
|
15. Blur both the white and black objects. |
| 16. Clip the black and white objects to the original cyan ‘A' object. This is a really neat feature in Corel Photo-Paint - the ability to ‘clip' one object to another. In the Objects Docker click the blank column between the object thumbnail and the ‘eye' icon for each of the black and white objects. A small paper clip appears beside the thumbnail for each of these two objects. | 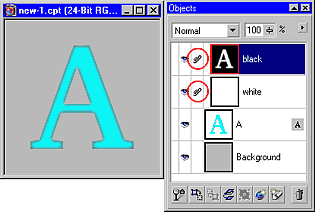 |
| 17. Shift the position of the clipped objects. Make sure the Object Picker Tool is selected. Select the ‘black' object in the Objects Docker. Using your keyboard arrow keys, move the black object two pixels up and two pixels left (click twice up and twice left). Select the ‘white' object and shift it 2 pixels down and two pixels right (the opposite to how you moved the black object. You image should now look like this: | 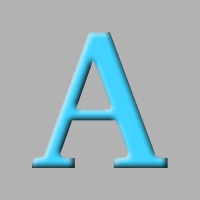 |
 | Try changing the placement of the white and black objects the other way around - the soft embossed effect appears reversed. You could consider this to be similar to changing the position of a light pointed at the object. |




No comments:
Post a Comment