Create a new document 850×900 pixels, select the color #3e3640 as your forground and #201f20 as your background. Select the gradient tool and drag a linear gradient over your canvas. Apply the noise filter by going to “filter > noise > add noise” enter the setting as in the image below.

Select the rounded rectangle tool and create a rectangle nearly the width of your canvas. Make a selection at the bottom of your rectangle about 50 pixels in height, cut and paste to a new layer. Hide your cutted part of the rectangle for later. You should have something like this.

Add these layer styles to your rectangle to complete the effect.


Move your rectangle to the top of your canvas hiding the top half of it where the rounded edges are.

Unhide your other part of the rectangle and align it up at the bottom of your rectangle.

Add these layer styles to your bottom half of the rectangle.


You should have something like this.

Add your website title, slogan and logo then with the rectangle marquee tool make a selection on your header like in the image below, fill the selection with the color white then lower opacity to 2%.

Do the same with the navigation.

Add your navigation text to your navigation, on one part of the navigation add a hover button.

The layer styles for the hover button are as follows.


I also add a little shine to the hover button like we did to the header and navigation in the previous steps. Using two 1 pixel lines add a divider inbetween each navigation item. Add a layer mask to the divider then drag a reflected gradient over the top to blend in the top and bottom half the divider.

Create a new layer above everything eles in your layers window, with the rounded rectangle tool create a rectangle like the image below.

Add these layer styles to the rectangle.


You should have something like this.


The the steps above and with the same layer styles add another big rectangle underneath the rectangle you just created.

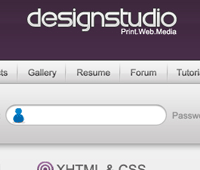
On the 1st rectangle we created add our login and password fields, the icons used in this part are from dryicons.

Once we’ve done that begin to fill in your content box with some content. The icons next to the titles are from the custom shapes libary within photoshop.

The read more buttons are made using the rounded rectangle. Inbetween each bit of text in the above image add a divider the same way we did on the navigation. Once you’ve done that select the rounded rectangle tool again and create a small box for our photo gallery.

Fill the rectangle with the color #e8e8e8 then add a 1 pixel stroke to it using the color #cbc9ca. Repeat this process to add more content to your design.

When your finished you should have something like this.


No comments:
Post a Comment