In this tutorial il show you how to create a dark style layout, firstly create a new document with the dimensions 950 x 1130 pixels. Fill your background layer with the color black. Select the rounded rectangle tool and set radius to 15px.
Draw out a rounded rectangle for your header. Leave equal amounts of pixels either side and dont place it right at the top of your canvas.
Add these layer styles to your header layer.


Your rectangle should be now transformed into the image below.

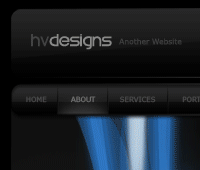
On the left side of the header add your website title and slogan, on the right side add 3 navigation items.

Inbetween the 3 navigation items on the right add a very small square or rectangle, i drawn 3 pixel long line. Once you have done that add this outer glow.

You should have something like this.

Finally make a selection on your header similar to the image below.

Fill the selection with the color white then set layer opacity to 2%. Underneath your header add another rounded rectangle using the rounded rectangle tool with a radius of 15px, this will be our navigation.

Add these layer styles to the navigation.


You should have something like this.

Make a selection across half of your naviagtion.

Fill the selection with the color white and set layer opacity to 5%. Now add your navigation text. Inbetween each item add a small divider. To make the divider create two 1 pixel lines next to each other using two different shades of grey, one dark and one light shade.

To create a hover on your navigation select the elliptical marquee tool and create a white circle. Have the top of the circle just overlapping the bottom of the navigation you want to hover.

Now goto “filter > blur > guassian blur”, blur by about 6-8 pixels. Set layer opacity to 23% then delete the bottom half of the circle so it comes level with the navigation.

Where now going to make a featured box for some featured content. Select the rounded rectangle and draw out a big rectangle underneath your navigation.

Dont fill your selection with a color, instead select a radial gradient with the color #2c2d2d as your forground and black as your background and create a radial gradient in the selection, start the gradient from the bottom left corner. Then add this stroke.
You should have something like this.

Add an image of your choice, im using the final result of my iphone light beams tutorial. Add it to the left side of the box. Now add some descriptive text on the right side.

The layer styles for the silver style button are as follows.


Using the same layer styles as we used for the header, navigation and featured box create more content boxes using the rounded rectangle tool.

Add your glowing dot that we used in the header and label each content box.

The 1st content box im going to use as an image gallery. With the rounded rectangle tool add another rectangle within the content box. Then add these layer styles.


You should have something like this.

Add an image inside the inner rectangle by copying an image to the clipboard then goto “edit > paste into”. Move your image into place then create a black rectangle across the bottom of the image set layer opacity to 40% then add some image info.

To the box on the right im going to add some simple news articles.

In the 3rd content box im going to add a flickr gallery. Create an inner rounded rectangle like we did in the 1st content box.

Add some flickr images within your inner rectangle, i made my images have rounded corners by copting them and pasting them into a rounded rectangle, doing this automatically adds a layer mask, just delete the rounded rectangle after.

With the elliptical marquee tool just add two black circles in the middle at each end of the gallery.

Inside the plain black circles just add a left and right glowing arrow.

Now for the footer, Duplicate your header and all it’s elements, drag to the bottom of your canvas. Delete the little navigation the the 3 glowing dots, replace with your copyright information.

Share and Enjoy


No comments:
Post a Comment