 Lets jump right in and open a new document by selecting File>New from the main menu or by pressing the keyboard shortcut Command-N (PC: Ctrl-N). The size of my working document for this lesson is 540×300 at 72ppi.
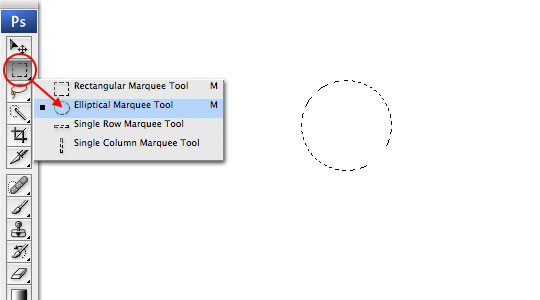
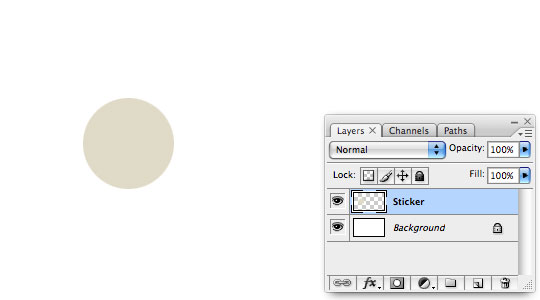
Create a new layer by choosing Layer>New Layer from the main menu or by using the keyboard shortcut Shift-Command-N (PC: Shift-Ctrl-N) and call the layer Sticker. Click on the foreground swatch in the Tools palette and set the color to #e0dac7. Now lets grab the Elliptical Marquee tool (which is in the Rectangular Marquee tool fly out menu) and while holding down the Shift key to constrain, click and drag a circular selection onto the stage. If you’re following along at home and want yours to be exactly like mine, my selection is 95×95px.
(*note: To create a new layer without the Layer Properties pop-up message use the keyboard shortcut Shift-Option-Command-N (PC: Shift-Alt-Command-N))
Fill the selection with your newly set foreground color by pressing Option-Delete (PC: Alt-Backspace), then deselect by pressing Command-D (PC: Ctrl-D)
Now lets go back to that Rectangular Marquee tool fly-out menu and re-select the Rectangular Marquee, or do it the easy way and use the keyboard Shift-M to switch back and forth between the two.
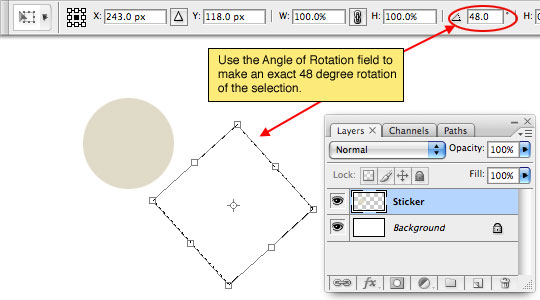
Drag a nice sized square selection onto the stage (don’t forget to hold Shift to constrain the proportions). Next lets rotate the selection by choosing Select>Transform Selection from the main menu. This will give you the Free Transform controls that you’re used to, but the transformation will only be applied to the selection (not the stuff on the layer). Using the Options bar at the top of Photoshop enter 48° into the rotation field and hit Enter to commit the transformation.
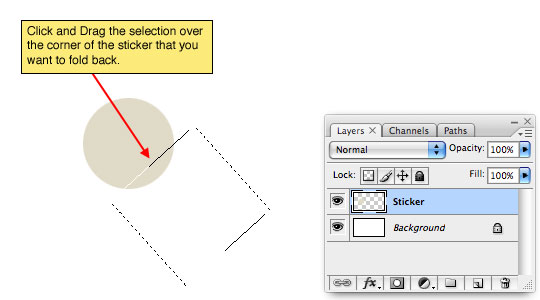
With the Marquee tool still selected, click and drag inside the selection to position it over the corner of the sticker that you want to be folded back.
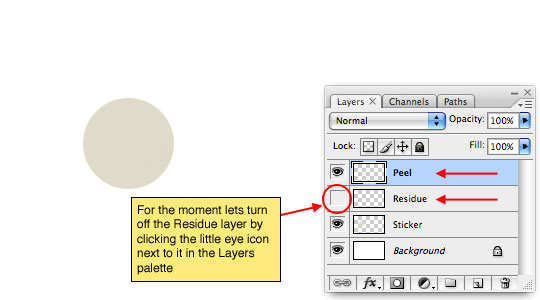
For the moment, lets turn off the Residue layer by clicking on the little eye icon at the left of it’s thumbnail in the Layers palette.
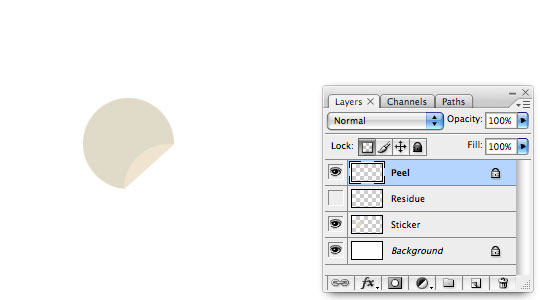
Lets lighten the corner of our circle that lives on the Peel layer. With the Peel layer selected, click on the Lock Transparent Pixels checkbox. Change your foreground color to a lighter shade of the same color, something like #efe4d0 should due nicely. Since the pixels are locked, all we have to do is fill the layer with color by pressing Option-Delete (PC: Alt-Backspace).
While we’re at it, lets go ahead and rotate the Peel layer so things are oriented correctly before we continue. We can do this easily by choosing Edit>Free Transform>Rotate 180° from the main menu (if for some reason this places the Peel somewhere other than where it ought to, simply press V to switch to the Move tool and move the little sucker into place.)
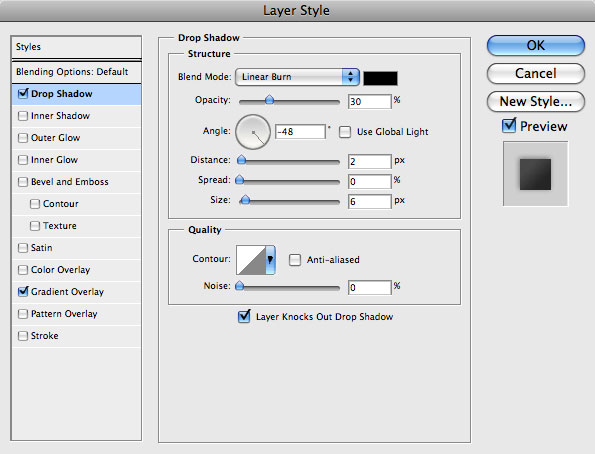
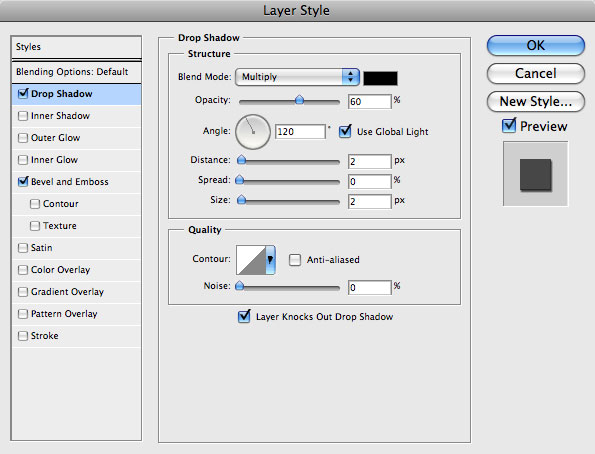
Before we get onto the body of the sticker, lets add a few layer styles to the Peel layer to complete it’s effect. Control-Click (PC: Right-Click) on the Peel layer in the Layers palette and choose Blending Options from the menu to bring up the Layer Style dialog box. We’ll be adding a Drop Shadow followed by a Gradient Overlay as shown below. Be sure to check each setting to make sure you’ve made all the necessary adjustments for the effect.
Notice in the Gradient Overlay dialog that we can get the Linear Gradient to lay perfectly onto the Peel because we know the exact angle we rotated it.


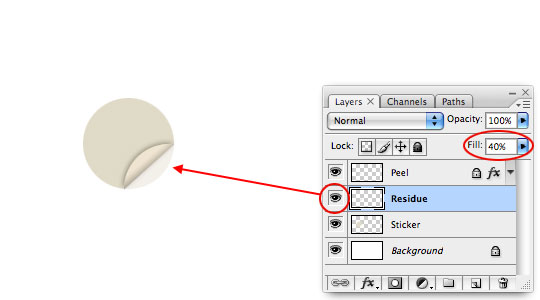
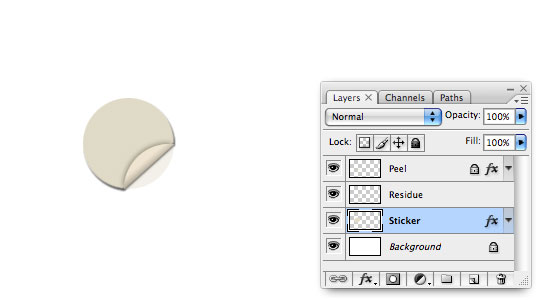
Now that we’ve got the Peel layer out of the way, lets click back down to the Residue layer, turn it back on by clicking the empty box at the left of the layer (which brings back the little eye icon) and then lower the layer’s Fill to 40%.
Click on the Sticker layer in the Layers palette and add the following Layer Styles (just like we did in Step 7), remember to pay close attention to each setting.
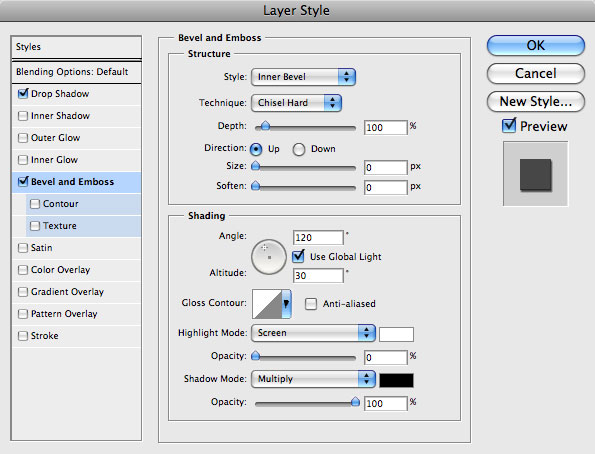
And if you did it right, things should be lookin’ like this.
With the Sticker layer still selected, add a new layer above it called Orange (unless you want to use some other color, then name it that. Anything but purple is ok… you know how I feel about purple). Set the foreground to a nice orange color like #eb8206 then press the M key to switch back to the Marquee tool (if you’re not still there). Make sure that you’ve got the Elliptical Marquee tool selected and drag a nice round selection into the middle of the sticker… and don’t make me remind you about the Shift key again.
If at any point while you’re dragging out your selection you feel like you need to move it, just reach over and press down the Shift key with your thumb. It’ll allow you to move the selection before you actually let go of the mouse and commit it. Now just press Option-Delete (PC: Alt-Backspace) to fill the selection with color followed by Command-D (PC: Ctrl-D) to deselect.
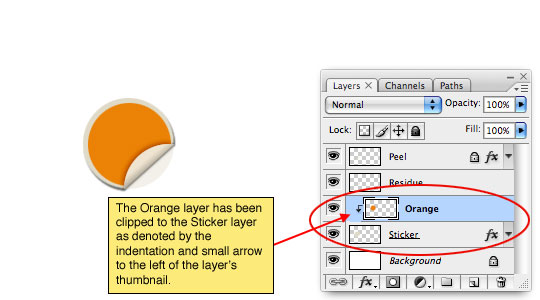
Now obviously we don’t want the orange sticking out past the edge we peeled back, so lets clip the Orange layer to the Sticker layer. To do this, hold down the Option (PC: Alt) key and place your mouse exactly between the two layers in the Layers palette. The cursor will change to what looks like two circles overlapping, when that happens, simply click your mouse to set the clipping mask. You’ll know the layer has been clipped because it will now be indented with a little arrow pointing down to the layer it’s clipped to.
(*note: You can also create a clipping mask by Command-Clicking (PC: Right-Clicking) on the Orange layer and choosing Create Clipping Mask from the menu.)
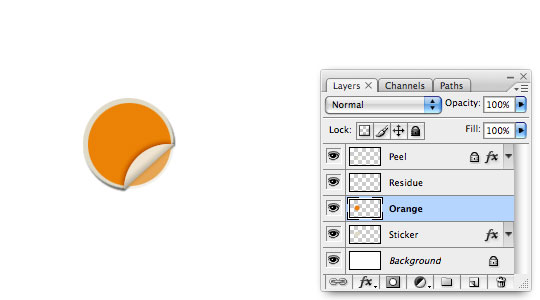
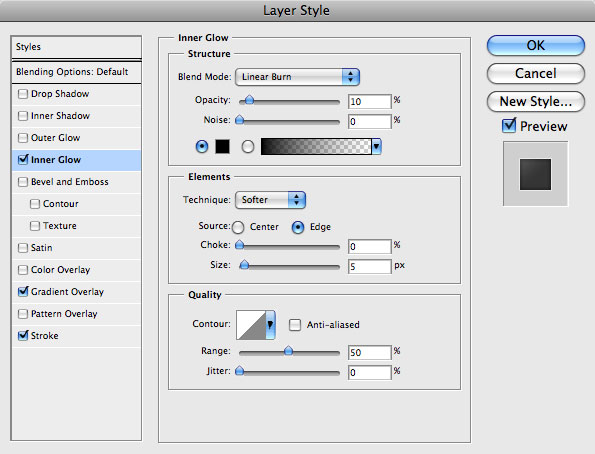
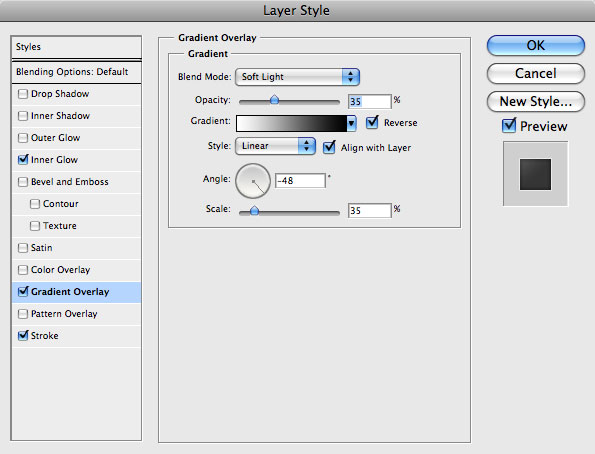
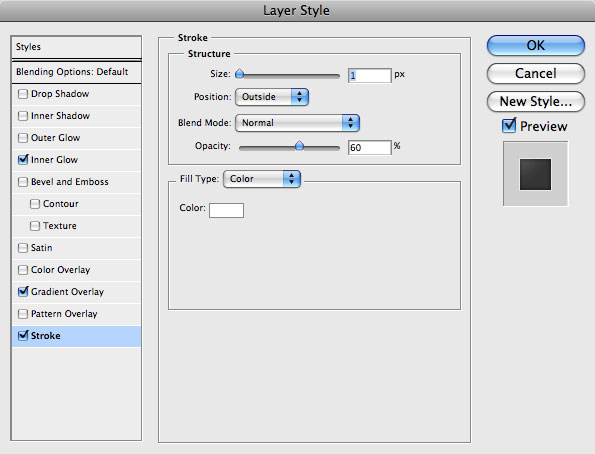
Now lets add some dimension to the Orange layer by adding a few simple Layer Styles. We’ll be adding an Inner Glow (which we’ll actually use to shadow the edges of the object), a Gradient Overlay to add some color variation and a Stroke to lightly define it’s edge. Follow along carefully.
If your sticker doesn’t look like mine I’m going to have to send you to detention.

The OnWired sticker has been antiqued a little, so why don’t we go ahead and beat ours up a little as well.
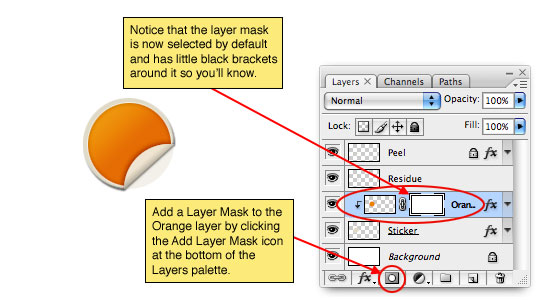
Start by adding a Layer Mask to the Orange layer (which should still be selected in the Layers palette) by clicking on the little icon at the bottom of the Layers palette that looks like a white circle in a gray box. You’ll notice in the Layers palette that a new thumbnail has been added next to the original one. This is the layer mask. By default when you add a Layer Mask, Photoshop selects the mask and you can tell it’s selected because it’s got little black brackets around it.
Using a layer mask will allow us to mess with the layer without actually damaging any of it’s pixels. It’s a great alternative to using the Eraser tool because you can always alter it later.
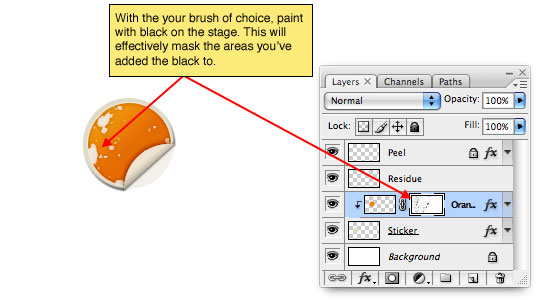
Reset the foreground color to black by pressing the D key, then press the B key to switch to the Brush tool. I’m going to use a grunge brush that looks like splatters to help me distress the layer. I’ve bundled every grunge brush in my collection into a single brush set which is included in the lesson download at the end of the tutorial. This brush is called Sampled Brush 4 and I’m using it at it’s default 551 pixel size.
With the brush selected and my foreground color set to black, I’m going to place the brush over my orange circle and click once or twice until I get the effect I want. By painting with black on the Layer Mask I am telling Photoshop to ignore any part of this layer that is masked by black on the Layer Mask.
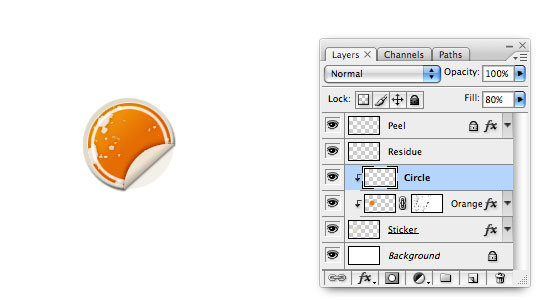
Now lets decorate the sticker a little. Create a new layer above the Orange layer called Circle and clip it to the layers below (just like we did in Step 13) by holding down the Option (PC: Alt) key and clicking the line between the Circle and Orange layers in the Layers palette.
With the Elliptical Marquee tool create a selection just slightly smaller than the orange circle, press Command-Delete (PC: Ctrl-Backspace) to fill the circle with the background color (which should still be set to white). From the main menu choose Select>Modify>Contract, set the size to 3 and click OK. Press Delete (PC: Backspace) to remove the color within the contracted circle and then press Command-D (PC: Ctrl-D) to deselect.
Lower the Circle layer’s Fill opacity to 80%.
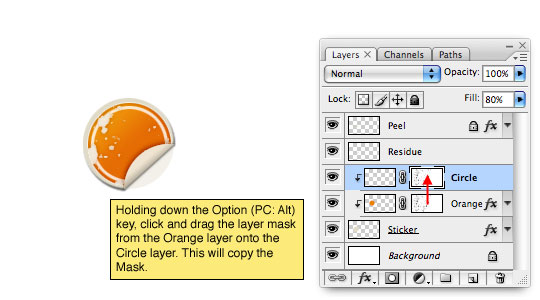
You’ll notice that although we’ve clipped the Circle layer to the Orange layer at the bottom of the clipping stack, the entire circle is still visible even where the Orange layer has been masked by it’s Layer mask. Obviously we can’t have that, so let me show you a little trick. Hold down the Option (PC: Alt) key and click and drag the Layer Mask that’s on the Orange layer onto the Circle layer in the Layers palette. This will copy the layer mask we’ve already created onto the other layer.
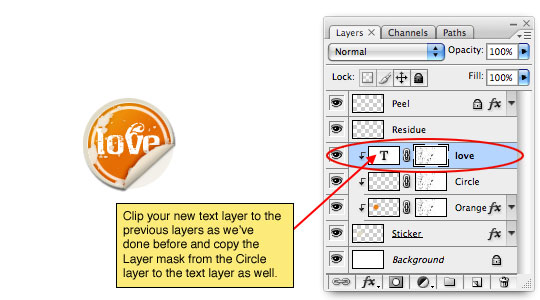
How ’bout we add some text to our sticker now? Press the T key to switch to the Text tool, press the X key to switch the white color swatch to the foreground color and type in your text. I’m using a font called Chicago House which will also be included in the lesson download. Click onto the stage to set your text field and type your message… mine’s LOVE, because, as you know… I love you.
Clip this text layer to the layers below just like we did in Step 18, then copy the layer mask from the Circle layer onto the text layer as well.
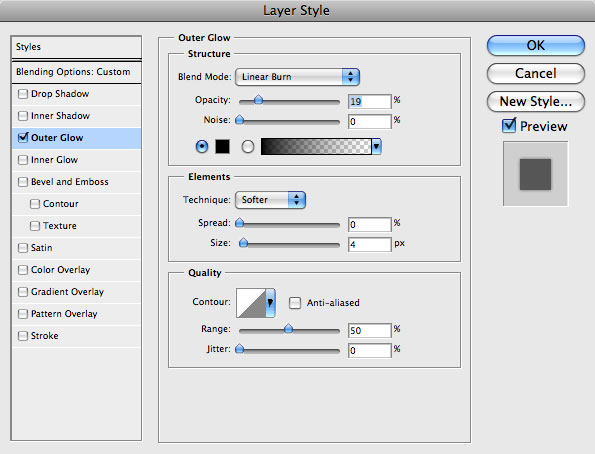
Lets use an Outer Glow Layer Style to make our text pop a little more. You know the drill…
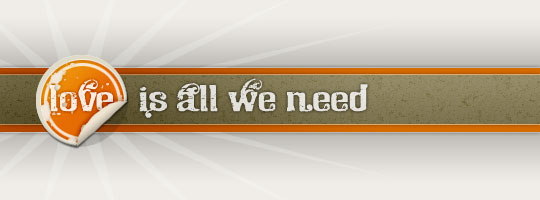
Your sticker is now complete! Add some background elements, some more text… go nuts!
And yes, for those of you who are wondering how I did the background, it’s all in the .PSD file download at the end of the lesson. Enjoy!


Great Tutorial, here's how mine turned out:
ReplyDeletehttp://photos-d.ak.fbcdn.net/hphotos-ak-snc1/hs015.snc1/2635_1083428495266_1512969658_229587_2692077_n.jpg
Very nice tutorial
ReplyDeleteExcellent post.
ReplyDelete