My Blog for your Knowledge

We'll make sure your website works for you...

The Road to Web designing

Art Illustrations

Do you want to look great?

24 February 2009

Peeled Back Sticker Effect

Lets jump right in and open a new document by selecting File>New from the main menu or by pressing the keyboard shortcut Command-N (PC: Ctrl-N). The size of my working document for this lesson is 540×300 at 72ppi.

Create a new layer by choosing Layer>New Layer from the main menu or by using the keyboard shortcut Shift-Command-N (PC: Shift-Ctrl-N) and call the layer Sticker. Click on the foreground swatch in the Tools palette and set the color to #e0dac7. Now lets grab the Elliptical Marquee tool (which is in the Rectangular Marquee tool fly out menu) and while holding down the Shift key to constrain, click and drag a circular selection onto the stage. If you’re following along at home and want yours to be exactly like mine, my selection is 95×95px.

(*note: To create a new layer without the Layer Properties pop-up message use the keyboard shortcut Shift-Option-Command-N (PC: Shift-Alt-Command-N))


Fill the selection with your newly set foreground color by pressing Option-Delete (PC: Alt-Backspace), then deselect by pressing Command-D (PC: Ctrl-D)


Now lets go back to that Rectangular Marquee tool fly-out menu and re-select the Rectangular Marquee, or do it the easy way and use the keyboard Shift-M to switch back and forth between the two.

Drag a nice sized square selection onto the stage (don’t forget to hold Shift to constrain the proportions). Next lets rotate the selection by choosing Select>Transform Selection from the main menu. This will give you the Free Transform controls that you’re used to, but the transformation will only be applied to the selection (not the stuff on the layer). Using the Options bar at the top of Photoshop enter 48° into the rotation field and hit Enter to commit the transformation.

With the Marquee tool still selected, click and drag inside the selection to position it over the corner of the sticker that you want to be folded back.


Now lets use a tricky keyboard shortcut to cut the selected area out of the current layer and place it on it’s own layer above. Press Shift-Command-J (PC: Shift-Ctrl-J) and watch the magic happen. Rename this new layer Residue by double clicking directly on the layer’s name in the Layers palette. Now duplicate the Residue layer by making sure it’s selected as the active layer in the Layers palette and then pressing Command-J (PC: Ctrl-J). Name this new layer Peel. Note that at this point nothing on the stage looks any different.

For the moment, lets turn off the Residue layer by clicking on the little eye icon at the left of it’s thumbnail in the Layers palette.

Lets lighten the corner of our circle that lives on the Peel layer. With the Peel layer selected, click on the Lock Transparent Pixels checkbox. Change your foreground color to a lighter shade of the same color, something like #efe4d0 should due nicely. Since the pixels are locked, all we have to do is fill the layer with color by pressing Option-Delete (PC: Alt-Backspace).

While we’re at it, lets go ahead and rotate the Peel layer so things are oriented correctly before we continue. We can do this easily by choosing Edit>Free Transform>Rotate 180° from the main menu (if for some reason this places the Peel somewhere other than where it ought to, simply press V to switch to the Move tool and move the little sucker into place.)

Before we get onto the body of the sticker, lets add a few layer styles to the Peel layer to complete it’s effect. Control-Click (PC: Right-Click) on the Peel layer in the Layers palette and choose Blending Options from the menu to bring up the Layer Style dialog box. We’ll be adding a Drop Shadow followed by a Gradient Overlay as shown below. Be sure to check each setting to make sure you’ve made all the necessary adjustments for the effect.

Notice in the Gradient Overlay dialog that we can get the Linear Gradient to lay perfectly onto the Peel because we know the exact angle we rotated it.

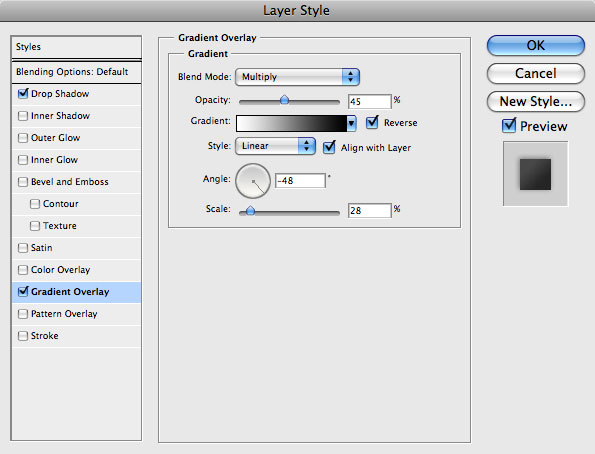
If you go it right, your Peel should now look like mine… if not, do not pass go, do not collect $200, just get yourself back to Step 7 and figure out where you went wrong!


Now that we’ve got the Peel layer out of the way, lets click back down to the Residue layer, turn it back on by clicking the empty box at the left of the layer (which brings back the little eye icon) and then lower the layer’s Fill to 40%.


Click on the Sticker layer in the Layers palette and add the following Layer Styles (just like we did in Step 7), remember to pay close attention to each setting.

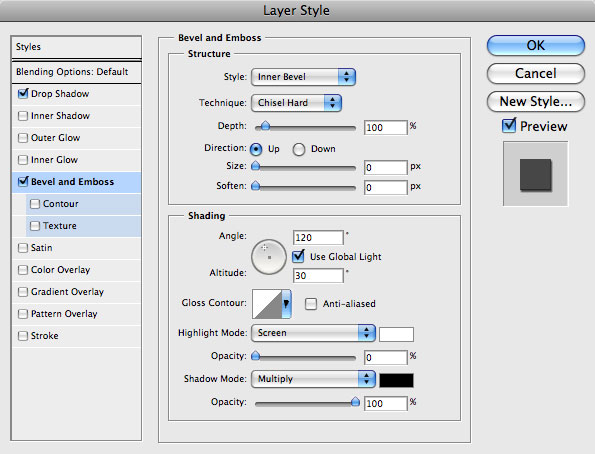


And if you did it right, things should be lookin’ like this.


With the Sticker layer still selected, add a new layer above it called Orange (unless you want to use some other color, then name it that. Anything but purple is ok… you know how I feel about purple). Set the foreground to a nice orange color like #eb8206 then press the M key to switch back to the Marquee tool (if you’re not still there). Make sure that you’ve got the Elliptical Marquee tool selected and drag a nice round selection into the middle of the sticker… and don’t make me remind you about the Shift key again.

If at any point while you’re dragging out your selection you feel like you need to move it, just reach over and press down the Shift key with your thumb. It’ll allow you to move the selection before you actually let go of the mouse and commit it. Now just press Option-Delete (PC: Alt-Backspace) to fill the selection with color followed by Command-D (PC: Ctrl-D) to deselect.


Now obviously we don’t want the orange sticking out past the edge we peeled back, so lets clip the Orange layer to the Sticker layer. To do this, hold down the Option (PC: Alt) key and place your mouse exactly between the two layers in the Layers palette. The cursor will change to what looks like two circles overlapping, when that happens, simply click your mouse to set the clipping mask. You’ll know the layer has been clipped because it will now be indented with a little arrow pointing down to the layer it’s clipped to.

(*note: You can also create a clipping mask by Command-Clicking (PC: Right-Clicking) on the Orange layer and choosing Create Clipping Mask from the menu.)


Now lets add some dimension to the Orange layer by adding a few simple Layer Styles. We’ll be adding an Inner Glow (which we’ll actually use to shadow the edges of the object), a Gradient Overlay to add some color variation and a Stroke to lightly define it’s edge. Follow along carefully.

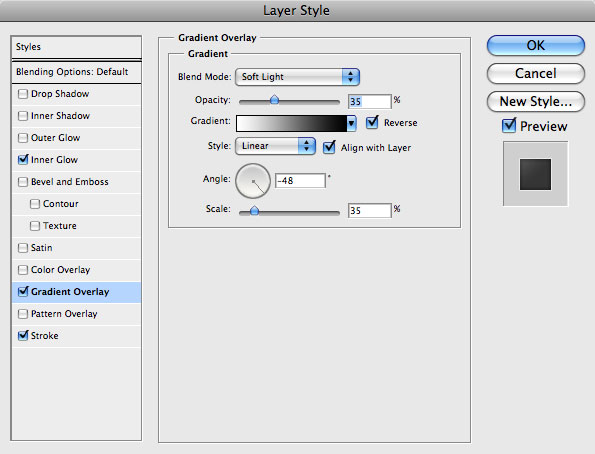
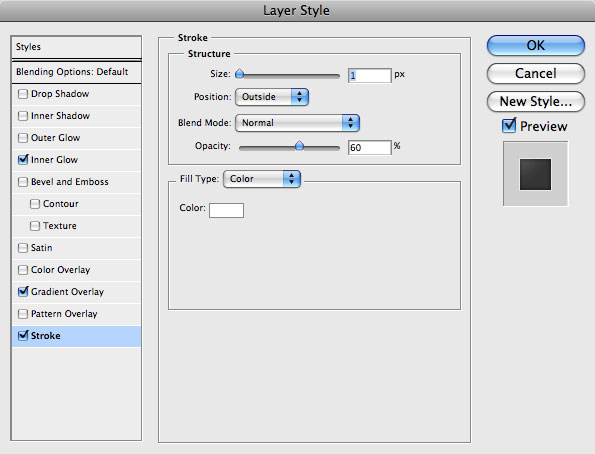
If your sticker doesn’t look like mine I’m going to have to send you to detention.

The OnWired sticker has been antiqued a little, so why don’t we go ahead and beat ours up a little as well.

Start by adding a Layer Mask to the Orange layer (which should still be selected in the Layers palette) by clicking on the little icon at the bottom of the Layers palette that looks like a white circle in a gray box. You’ll notice in the Layers palette that a new thumbnail has been added next to the original one. This is the layer mask. By default when you add a Layer Mask, Photoshop selects the mask and you can tell it’s selected because it’s got little black brackets around it.

Using a layer mask will allow us to mess with the layer without actually damaging any of it’s pixels. It’s a great alternative to using the Eraser tool because you can always alter it later.

Reset the foreground color to black by pressing the D key, then press the B key to switch to the Brush tool. I’m going to use a grunge brush that looks like splatters to help me distress the layer. I’ve bundled every grunge brush in my collection into a single brush set which is included in the lesson download at the end of the tutorial. This brush is called Sampled Brush 4 and I’m using it at it’s default 551 pixel size.

With the brush selected and my foreground color set to black, I’m going to place the brush over my orange circle and click once or twice until I get the effect I want. By painting with black on the Layer Mask I am telling Photoshop to ignore any part of this layer that is masked by black on the Layer Mask.

Now lets decorate the sticker a little. Create a new layer above the Orange layer called Circle and clip it to the layers below (just like we did in Step 13) by holding down the Option (PC: Alt) key and clicking the line between the Circle and Orange layers in the Layers palette.

With the Elliptical Marquee tool create a selection just slightly smaller than the orange circle, press Command-Delete (PC: Ctrl-Backspace) to fill the circle with the background color (which should still be set to white). From the main menu choose Select>Modify>Contract, set the size to 3 and click OK. Press Delete (PC: Backspace) to remove the color within the contracted circle and then press Command-D (PC: Ctrl-D) to deselect.

Lower the Circle layer’s Fill opacity to 80%.

You’ll notice that although we’ve clipped the Circle layer to the Orange layer at the bottom of the clipping stack, the entire circle is still visible even where the Orange layer has been masked by it’s Layer mask. Obviously we can’t have that, so let me show you a little trick. Hold down the Option (PC: Alt) key and click and drag the Layer Mask that’s on the Orange layer onto the Circle layer in the Layers palette. This will copy the layer mask we’ve already created onto the other layer.

How ’bout we add some text to our sticker now? Press the T key to switch to the Text tool, press the X key to switch the white color swatch to the foreground color and type in your text. I’m using a font called Chicago House which will also be included in the lesson download. Click onto the stage to set your text field and type your message… mine’s LOVE, because, as you know… I love you.

Clip this text layer to the layers below just like we did in Step 18, then copy the layer mask from the Circle layer onto the text layer as well.


Lets use an Outer Glow Layer Style to make our text pop a little more. You know the drill…

Your sticker is now complete! Add some background elements, some more text… go nuts!

And yes, for those of you who are wondering how I did the background, it’s all in the .PSD file download at the end of the lesson. Enjoy!

Download PSD

20 February 2009

Layer Style And Layer Mask Interaction


In this Tips & Tricks tutorial I’m going to show you a neat little trick involving layer styles and the way they relate to layer masks.

You know how sometimes you think you’re so damn smart… And then you learn something so basic that it makes you feel silly for thinking you were at all smart in the first place? Well, if you’re a long time PS user like me and you don’t know this trick, be prepared to have that feeling.

I never new about this little gem and just had processes in my workflow to compensate, so I can’t say I ever missed it, but now that I know, I use it all the time!

I’ve setup a simple example below to help me demonstrate. I’ve added a new layer and with the Elliptical Marquee tool created and filled a circular selection which I then applied a few simple Layer Styles to (ie. Drop Shadow, Outer Glow and Bevel & Emboss).


Next, I’ll grab the Rectangular Marquee tool and create a selection around the top of the circle. With that selection made I’ll click the Add Layer Mask icon at the bottom of the Layers palette to add a Layer Mask to this layer. The issue we’re going to solve today now becomes evident. As you can see, not only have I masked the circle, but Photoshop has now automatically adjusted all the layer styles to apply only to the unmasked pixels on the stage. Now, sometimes you want this to happen… But sometimes you don’t.


Adding a Gradient to the layer mask to create a fading effect compounds the problem as Photoshop struggles to apply Layer Styles to partially transparent pixels causing the bottom of the circle to take on a blackish look due to blending that’s going on with the underlying Drop Shadow.

So here’s the Tip:
If we open the Layers Styles dialog for the Circle layer back up by double-clicking on its Layer Style icon, we are by default opened to the Blending Options page. You’ll notice that in the center of the dialog is a section called Advanced Blending and inside that area is a feature called Layer Mask Hides Effects. By default this checkbox is not checked. Notice also that the next unchecked box is for Vector Masks, which makes this tip relevant to both types of masks.


If I click on the Layer Mask Hides Effects box, you can see that now the mask is independent of the Layer Styles and is applied to the actual pixels on the layer AND the layer style in exactly the same way.

If you already knew this little tip, shame on you for not sharing it with the rest of us… And if you didn’t and are now having that feeling I mentioned, don’t worry, I won’t tell anyone.


18 February 2009

Creating an Mini Interior Scene

In this tutorial I would like to show you how to make an interior scene using 3dsmax 8 and rendering with Vray . Certainly you can use other version of 3dsmax and Vray but it's possible that you will not get the same result as it's showed. Tutorial is very detailed so beginners should not be worried that they will not manage with this. But it's usefull to know basic tools and interface in 3dsmax.

In the final part you can download scene file.
Have fun in 3d world ...


Step 1: Create a plane with dimensions 5 meters on 8 meters. And
segments 8 on 5 . Convert to editable poly and extrude the right polygons.
The ceiling is about 2,65 meters high.

Creating edge > Quick Slice
Extrudnig >Extrude
Connecting vertexes together > Collapse

Remember to use right reasonable scale of scene.

In this scene 1 Unit = 1 Centimeter


Step 2: Create a frame of a window . First place box with window hole
width. Segments about 3 / 4 .Move vertexes to make a section of frame.
Copy this boxes and connect by moving edges. Remember to Collapse
vertexes ! On the left picture you can see two methods to connect boxes.


Step 3: Apply Mesh Smooth modifer to the window frame . Set type:
Classic, Iterations : 2 and Strenght: 0,2 . To smooth wire properly , create
an additional edges ( in the picture ) .


Step 4: Copy frames to second window and to balcony doors. In the last , move vertexes to fit dimensions to the door. And create handles from small box. And apply Mesh Smooth . Don't forget window sills.


Step 5: Creating railing is very easy but time-consuming and boring. Made it using boxes with small Mesh Smooth ( strenght : 0,04 ) Than Attach them. Add Mesh Smooth only to main upper and lower railings .


Step 6: Let's make some furniture. A simple bookshelf made of boxes and shelves ( 105 x 210 x 60 ).


Step 7: Than, make similar cabinet with hidden shelfes on the bottom and table with glass table top. Dimensiond are in picture.


Step 8: Now. We will make a chair. Create four identical legs. Extrude the upper polygons and connect them to create a chair basis. To make bent backrest , extrude polys , select them and apply Bend modifer. ( Polys must be all time selected ) with Angle : 10 - 20 . After that. Right click on Bend modifer and use Collapse All . You have bent back rest but it's not connected properly with a rest of chair. You must rotate polygons in right direction to level with base.
Cushion is made of simple box with 4x4x4 segments and Mesh Smooth.


Step 9: Making courtains. Make two a little simillar Point Curves NURBS . Move one to the top of the window , second to the bottom of the window. Attach them and use Blend Tool to connect shapes.
Also create a courtain rail.


Our scene should look like that.

Instead of the frill you can make cornice .

Step 10: Create a radiator using 6 boxes with small Mesh Smooth . To make 6 boxes with the same distance use Array tool.

Step 11: Create a heap of magazines and newspapers. Just make a box , convert to Editable Poly and move vertexes on corners a little down. Click on the picture to see the model.

Step 12: In last step we will add some live to our scene - houseplant. First create shape of leaf using LINE ( create>shapes>splines>line ) Create a shape like on the screen saver. In INTERPOLATION set 16 steps. Next apply Extrude Modificator with amount 0,2 and 2 segments.

Next add Bend Modifer and use amount what you want. Collapse all modifiers and convert to Editable Poly. Move the pivot point to the base of leaf which will be in the center of the plant. Set the name of this leaf (e.g. leaf01 :)

Than hold the Shift Button and rotate the leaf several times. Rescale some leaves to make plant more natural.

Step 13: Creating a flowerpot.

Create a section of the flower pot using Line . After that apply Lathe modifier and click on Align MAX. Check Weld Core and set segments on 48 or more.

Than convert to Editable Poly. In this Part of the tutorial we will add some decor elements, and objects. It's very casual .You can make everything what you want. Walls color , lamp, books depends of your imagination.But materials and textures will be showed only for objects I showed below.

Step 1: Create a lamp . Use 3 boxes and thin cylinders for strings. Dimensions are on the picture.

Step 2: Making the bowl . First create a box with 10x10x1 segments. Set different Smoothing Groups for different groups of polygons. It's important to get sharp corners. Than Move vertexes using Soft Selection. Apply Mesh Smooth with 2 iterations and check Surface Parameters > Smoothing Groups. Bowl ( I really don't know how to call it in English :) ) should look like on the picture.

Step 3: Create a photo frames and frame on the wall. Don't forget about Smoothing Groups in the photo frames ! Frame on the wall is a simple box with moved vertexes. To the center polygon ( in this will be photo or painting ) set ID 2 , to the rest of polys set ID 1. It's important because we will use Multi Sub object to this object.

Step 4: Tablecloth is made of box with extruded polygons on the edges and folds.

Step 5: Add some books on the shelves and some boxes. And don't forget to insert a window panes ( boxes ). In this Part you will learn how to use textures and create Vray materials.

Remember ! To see Vray materials in Material Editor you have to Assign Renderer by pressing F10 and choose Vray renderer as the Production renderer.

First download this textures :

>> mtextures.rar<<

Step 1: First of all we should finish the room model. Create a ceiling and the rest of walls. Remember that polys should be also from the exterior. If you don't do that light will pass through the "roof" and scene illumination will be incorrect.

Step 2: Set the materials on floor and walls. Select the all polygons of walls and floor. Set the ID " 1 " Select only walls , set ID " 2 " . Than select the wall that will be green or other color and set ID " 3 ".

Step 3: Open Material Editor ( Hotkey : " M "). Select one ball. Click on the Material Type button and Choose Multi/Sub Object. Than choose " discard old material" . Set number on "3".

Step 4: Now click on the material with ID = 1 . And again click on material type button and choose VRayMtl . You will see the options of VRay material. On the top is a color of material and small box to apply a textures and maps ( red 1 ) . Click it and choose " bitmap ". Choose from your " directory/floor.jpg " file. Now the bitmap options window will open. You can set there rotations, colors etc. of bitmap. To see bitmap in viewport click icon with chessboard ( red 2 ) . Now back to the Floor Material by pressing icon with arrow ( red 3 ).

Step 5: Ok, our floor is wooden :) But it doesn't reflect anything! Click on Reflect color and set
RGB: 49,49,49 or just whiteness value to 49. Than set Glossiness to 0,7 . Glossiness is a kind of sharpness of reflection or refraction . Glossiness 1.0 is maximum sharp. Lower values makes reflection more blured. After that open Maps and "drag and drop" diffuse map to the Bumpmap slot and set amount to 20 .


Step 6: Now you know how to set colors and parameters so I will tell you only values.

White wall:
Color RGB: 254 , 255 , 253

Green wall:
Color RGB: 169 , 205 , 107

It's all about the floor and wall material. Now select your building and in Material editor select our Multi/Sub Material and click icon " with ball , arrow and box " :) You should see big texture on the floor and colored walls. Texture is too big but in next step i will show you how to small it.

Step 7: To set the right size of texture add UVW Map Modificator to the building .Click Bitmap Fit button and choose floor.jpg texture. Now select the Gizmo ( Hotkey : 1 ) and rescale it to make floor smaller.

Step 8: Now let's texturize our bookshelf. Create new VrayMtl material. Choose wod02.jpg texture.
Reflection: 15 and Glossiness : 0,65 . Add this material to bookshelf and shelves. Apply UVW Mapping Modifer. Choose Box Mapping and use Bitmap Fit . To make shelves different , select polygons and add UVW Mapping to differend shelves ( I selected two groups of 3 shelves ) . Than apply Poly Select Modifer , select other group of shelves and apply UVW Mapping.
Just open the screensaver.

Step 9: Texturing table. Create new VrayMtl material. It will be a table top.

Diffuse color:
RGB ( 198 ; 219 ; 207 ) Reflect: 20 Refract: 247

Fog color:
RGB ( 144 ; 211 ; 198 )

Fog multiplier: 0,02

Affect shadows, affect alpha. Apply this material to the table top.

Step 10:
Now create a new material for legs and shelf.

Bitmap: wood01.jpg Reflect: 15 Glossiness: 0,65

Copy Diffuse Map to the Bump slot. And set

Bump : 5

Apply material to the legs and shelf. And use UVW Modifier to fit bitmap.

Step 11: To the chair apply the same material we used to the table and apply UVW Mapping. For the cushion create new Vray material :

Color :
RGB ( 254 ; 248 ; 230 )

Add Diffusemap : "cushion_bump.jpg " ammount : 20
Add Bumpmap : " cushion_bump.jpg " with ammount 35 .

Than copy 5 chairs with cushions. The UVW settings will be the same.

Step 12: Material for table cloth :

Diffusemap: "tablecloth.jpg" Bumpmap: "tablecloth.jpg" amount : " 30 "

Apply and use UVW Mapping.

Step 13: Radiator material:

Color:
RGB ( 242 ; 242 ; 242 )

Glossiness : 0,95

Reflection: 30

Step 14: Lamp material:

Color:
RGB ( 247 ; 247 ; 247 )

Reflect : 20
Glossiness: 0,9
Bump: Noise ( amount 20 )

Glasses :
Color:
RGB ( 247 ; 247 ; 247 )

Reflect: 20
Refract: 247

Affect shadows and alpha .

Step 15: Curtain material:Click on the picture to see curtain settings.

Step 16: Windows material:

Color:
RGB ( 238 ; 238 ; 238 )

Reflect: 10
Glossiness: 0,9

Step 17: Sill material

Texture: wood02.jpg

Reflect: 15
Glossiness: 0,9

Bump: wood02.jpg ; Amount: 20

Step 18: Bowl material

Click on the picture to see values.

Colors:

Diffuse ( 153 ; 0 ; 0 )

Reflect : 45

Refract ( 216 ; 106 ; 106 )

Step 19: Flower material with SSS. The material is in the Material Library.

End of Part3: Texturing and materials

All materials are on right places and objects.
Now we can start setting lightning and rendering.

There is a material library of our scene :

>> interior matrials <<

Step 1: First we have to create sun :) Create Direct Light.

Settings: Shadows : Vray

Multiplier: 1.0

Check Area Shadows , subdivs=12 .

Step 2: Adding Vray Lights . Place Vray Lights in windows . Two in the nearby room. Click on the picture to see all Lights settings.

Step 1: Click on the picture and copy rendering settings.

I hope this tutorial was helpful for you . Here are some renders of this interior.

And 3dsmax 6 scene file :

.. minterior.max ..


To add a background you must save render as Targa Image. After you must apply a layer with background and adjust colors and illumination.

Apply to be a Chitika Publisher!
Follow on Buzz