My Blog for your Knowledge

We'll make sure your website works for you...

The Road to Web designing

Art Illustrations

Do you want to look great?

31 January 2009

Create a Gallery Flash Tutorial

A Flash tutorial to create a gallery with a jagged transition.


Step 1. First of all you'll need to download the FLA containing some images images for you to work with and the gallery background. Once you've done that, open it up and go into the gallery MC, where you'll see the background on it's own layer and MC (Movieclip)

Step 2. I the library you'll see the image and thumbnails in their own folder.


Step 3. To initiate the image transition, we're going to use some thumbnails. Drag over the thumb-0 image from the library to a new layer called "thumbs", and Convert it to an MC called thumb0.


Step 4.
Add the rest of the thumbnails and convert them to MC's thumb1, thumb2 etc

Step 5.
This is part 2 of the tutorial to create a gallery with a jagged transition effect. Next, click on the 1st thumbnail MC and, from the properties panel, give it the instance name thumb0. We'll be using this instance name to refer to the thumbnail with Actionscript.


Step 6.
Drag the larger version of the image onto the stage, and convert it to an MC called image0, making sure to check the box "Export for Actionscript". This will give the MC the identifier "thumb0", which will be used later to reference the MC when the Actionscript is written. ONce you've done that delete the MC from the stage.


Step 7.
Add each other large image, convert them to MCs and give them identifiers.


Step 8.
This is part 3 of the tutorial, where we'll be creating the jagged shaped masks. Next, create a rectangle the same size as the large images (320 x 230)


Step 9.
Convert the rectangle into an MC called mask0, with an identifier of the same name.


Step 10.
Go into the MC.


Step 11.
Choose the Lasso Tool (image a) and, under the Tools options, choose "Polygon Mode" (image b).

a)
b)


Step 12.
We're going to use the lasso tool to cut the red rectanle into 2 jagged shapes. Start by clicking from the top left, just outside of the rectangle, and then click again below the rectangle, to create a steep diagonal line. Click for the 3rd time at the top, above the rectangle, and continue to creating diagonal line across the rectangle.


Step 13.
ONce you get to the end to the right, join the last diagonal line with the 1st point that was clicked. This should create a selection, as shown below.


Step 14.
Convert the selection to an MC called "mask1", giving it an identifier with the same name.


Step 15.
Delete the mask1 MC, leaving you with the bottom jagged shape in mask0.


Step 16.
In the gallery MC create a new layer called script, open up the Actions panel and enter the code shown below

Line 1 - 2: Create an array called order. When we attach the images, two masks & copies of each image will be attached. A 2D array (Arrays within an array) is used to hold the order of each image segment. The numbers have been rearranged so that none of the images will be alligned properly, when the gallery is first dispalyed.


Step 17.


Line 3: A for loop is created to create two groups of images, consisting of an empty MC and a mask (mask0 & mask1). The "j" in the loop will start off at 0 and increment by 1 (j++), while j is below 2 (i

Line 4 : Variable "i" will temporarily hold the path of images.

Line 5 : Variable "m" will temporarily hold the path of the masks.

Line 6 : The mask's X position and image target's are set.

Line 7 - 8 : The mask's and image's Y position are set.

Line 9 : The mask (m) is set to mask the images (i)


Step 18.


Line 10: Another loop is used to attach a version of each image to each images MC (image0 -image2). Using "j" from the previous loop and "k" from this loop, the "order" array is looped through to attach the image number from the library.

Line 11: We use the temp variable "i", holding the path of the images0 - image2, to attach them images. We store the new path in the img variable.

Line 12: Each image is placed on an X position, using the images width multiplied by the increment K number.

Line 13: We use a temporary "thumb" variable to hold the name of each thumb associated with the image position.

Line 14: The thumbnail is given propertes (2 in total) for each position images0 - images1 must move to in order to display an alligned image.

Step 19.


Line 19 - 24: 2 functions are created to increase and decrease the opacity of the thumbnails, as they are rolled over and rolled out.


Step 20.

Line 27 - 28: The targets are set to equal the positions to display image4, which is stored in thumb4.pos0 & thub4.pos1

Line 29 : A speed variable is set for how fast the images scroll.


Step 21.


Line 30: An onEnterFrame function is created which will execute any code inbetween the braces {} repeatedly, at the frame rate (30) of the movie.

Line 31 - 33: This is the code used to move "images0" & "images1" MC to the "target" value minus the images current X position divided by the speed, whenever a thumb is pressed.


Step 22. Entire Code


And that's all the Actionscript that needs to be written to create the jagged transition gallery.

Download FLA (not preloaded)

Download FLA (preloaded)

Recent Comments Widget For Blogspot Users

Today, I am releasing the Recent Comments widget for blogspot user.

How is it different from the other Recent Comments widget?

The problem with other widgets is that the source code for them lies with the widget author and the authors often integrate it in within their own site. If because of some problem their site is down, the recent comments widget will not work.

Here, I am releasing the source code so that the logic would reside within your blog itself and hence you can do away with dependency on 3rd party site not under your control.

How to install Recent Comments widget for blogger?

  • Login to the blogger dashboard.
page elements
  • Go to ‘Page Elements’ tab
  • Click on Add a Gadget. Select HTML/Javascript widget type.

image
  1. Now this is the most important step. Select the whole code given below and paste it in the widget box you have just opened above.
    <script style="text/javascript">

    function showrecentcomments(json) {

      var numcomments = 5;


      var showcommentdate = true;

      var showposttitle = true;

      var numchars = 100;


    for (var i = 0; i < numcomments; i++) {

        var entry = json.feed.entry[i];

        var alturl;


        if (i == json.feed.entry.length) break;

    for (var k = 0; k < entry.link.length; k++) {


          if (entry.link[k].rel == 'alternate') {

            alturl = entry.link[k].href;

            break;

          }

        }


       alturl = alturl.replace("#", "#comment-");

       var postlink = alturl.split("#");

       postlink = postlink[0];


       var linktext = postlink.split("/");

       linktext = linktext[5];

       linktext = linktext.split(".html");

       linktext = linktext[0];


       var posttitle = linktext.replace(/-/g," ");

       posttitle = posttitle.link(postlink);

       var commentdate = entry.published.$t;

       var cdyear = commentdate.substring(0,4);


       var cdmonth = commentdate.substring(5,7);

       var cdday = commentdate.substring(8,10);

       var monthnames = new Array();


       monthnames[1] = "Jan";

       monthnames[2] = "Feb";

       monthnames[3] = "Mar";

       monthnames[4] = "Apr";


       monthnames[5] = "May";

       monthnames[6] = "Jun";

       monthnames[7] = "Jul";

       monthnames[8] = "Aug";


       monthnames[9] = "Sep";

       monthnames[10] = "Oct";

       monthnames[11] = "Nov";

       monthnames[12] = "Dec";


       if ("content" in entry) {

         var comment = entry.content.$t;}

       else


       if ("summary" in entry) {

         var comment = entry.summary.$t;}

       else var comment = "";


    var re = /<\S[^>]*>/g;

       comment = comment.replace(re, "");

    document.write('<br/>');

       if (showcommentdate == true) document.write('On ' + monthnames[parseInt(cdmonth,10)] + ' ' + cdday + ' ');


    document.write('<a href="' + alturl + '">' + entry.author[0].name.$t + '</a> commented');

       if (showposttitle == true) document.write(' on ' + posttitle);


    document.write('<br/>');

    if (comment.length < numchars) {

    document.write('<i>');


             document.write(comment);

    document.write('</i>');}

       else

            {

    document.write('<i>');


             comment = comment.substring(0, numchars);

             var quoteEnd = comment.lastIndexOf(" ");

             comment = comment.substring(0, quoteEnd);

    document.write(comment + '...<a href="' + alturl + '">(more)</a>');


    document.write('</i>');}

    document.write('<br/>');

      }

    document.write('<br/>');


    }

    </script>

    <script src="http://xyz.blogspot.com/feeds/comments/default?alt=json-in-script&callback=showrecentcomments">

    </script><a href="http://reviewofweb.com/blogging/recent-comments-blogspot-widget/">Widget </a>by <a href="http://reviewofweb.com/">ReviewOfWeb</a>


  2. Scroll down to src=http://xyz.blogspot.com and replace xyz with your blog’s name. For example if your blog’s URL is http://abc.blogspot.com then the code should become src=http://abc.blogspot.com DO NOT TOUCH any other part of the code or else it might create problems.

  3. You are done! Lastly please do not remove the footer credits*.

Please let me know if you face any problem implementing the code above.

Like the post above? I recommend you to subscribe via RSS Feed. You can also subscribe by email and have new articles sent directly to your inbox. It doesn't cost you anything!

Virtual Trash: Flash Tutorials with Action Script

Use startDrag, stopDrag, _droptarget, onPress and onRelease functions to simulate virtual trash.


This tutorial is advanced, you have to understand basic commands of Flash Designer.


Download source project t1049.zip (86 kb)


  1. Launch Flash Designer and set movie dimensions 300 x 300.
  2. Create 4 blank frames with "Frame" > "New" so you have "Frame 1" to "Frame 5" in the frame list.
Frame 1
  1. Download t1049.zip file and extract trash images.

  2. Import image "pieceofpaper.gif" (File > Import Image) and move it outside visible area.
  3. Convert it to sprite (Edit > Convert to Sprite), name it "Garbage" and check "ActionScript" target (Item > Placement Properties)
  4. Import image "opentrash.gif" and move it to X:170, Y:118 (Edit > Move To) .
  5. Draw an ellipse over the hole of the trash. Set fill color to black, 1% opacity, no line
  6. Convert it to sprite, name it "Hole" and check "ActionScript" target
  7. Add the text "Put all papers into trash"
  8. Add Frame ActionScript (Frame > ActionScript):

    maxpapers=1;

Frame 2
  1. Add the text "GET READY!"
  2. Set background to "Frame 1"

Frame 3
  1. Set frame delay to "Stop"
  2. Set background to "Frame 1"
  3. Import "laser.wav" sound and set the frame sound
  4. Add Frame ActionScript:

    maxpapers = maxpapers * 2; // at each run increase the number of pieces
    collected = 0; // count collected items

    function checkifallcollected()
    {
    // check if all items are collected and go to congratulations frame
    if(collected==maxpapers) gotoAndPlay("Frame 4");
    }

    // this array will hold all pieces
    var garbages = new Array();

    // create maxpapers pieces
    for(i=0;i<maxpapers;i++)
    {
    // create new instance of the paper
    garbage[i] = Garbage.duplicateMovieClip("garbage"+i,100+i);

    // put it in random place and random rotation
    garbage[i]._x = 30+100*Math.random();
    garbage[i]._y = 30+200*Math.random();
    garbage[i]._rotation = 360*Math.random();

    // define mouse events
    garbage[i].onPress=function() { this.startDrag();};
    garbage[i].onRelease=function()
    {
    // check if this piece hits the hole
    if(this._droptarget=="/Hole") {this.removeMovieClip();collected++;}

    stopDrag();
    checkifallcollected();
    };

    }

Frame 4
  1. Import "elecshot.wav" sound and set the frame sound
  2. Import image "closedtrash.gif" and move it to X:174, Y:163.
Frame 5
  1. Set frame delay to 3 seconds
  2. Set background to "Frame 4"

  3. Set loop to frame 2 ("Frame" > "Loop" command)
  4. Import "clap.wav" sound and set the frame sound

Text Animation in Flash

To create the text animation:

  • Launch Flash Designer and choose "Blank document".
  • Choose "Frame" > "Frame Size" to set movie dimensions, for example 400 x 200.
  • Choose "Text" tool and click on the frame. Type the text (for example "Text Animation") and click OK.
  • Choose "Edit" > "Align" > "Center on Page" to center the text on the frame.
  • Choose "Animation" > "Intro Animation", check "Enable Animation" and choose "Zoom" effect.
  • Click "Text Animation", check "Enable Glyph Animation" option and click OK twice.
  • Press F9 to preview the animation. Hit "Alt+F4" to close preview.
  • Choose "Animation" > "Intro Animation"
  • Check "Fade" option. Click OK.
  • Press F9 to preview.

Way & Always Visible option

  • Make sure the text is still selected.
  • Choose "Animation" > "Intro Animation"
  • Check "2 Way" and "Always Visible" option. Click OK.
  • Press F9 to preview.

30 January 2009

13 Premium-Like Wordpress Themes That Are Free And Stunning

Wordpress, a fastest growing blogging platfrom and getting more and more every day. This is a reason that demands related to wordpress themes and plugins are increasing as well. No doubt, you may easily found thousands of free wordpress themes on internet but how about if we will help you and get the latest list of free and stunning wordpress themes.

Today, we are posting another great post that covers 13 Premium-Like Wordpress Themes That Are Free And Stunning. This is not the long list with all the available wordpress themes on the internet but its an exclusive collection of free wordpress themes that are premium-like free themes and you may consider any of these themes as per your need.

You are welcome to share if you know and want to share more stunnig wordpress themes that are looking professional and our readers/viewers may like. Do you want to be the first one to know the latest happenings at SmashingApps.com just subscribe to our rss feed and you can follow us on twitter as well.

I will appreciate if you can spread the word via Digg, and other social media websites, Thank you.

FREEmium wordpress theme

FREEmium wordpress theme

One of the beautiful theme by designed by Paul Kadysz and developed by Dariusz Siedlecki. When you see the them, I sure you will love it.

ZinePress: A Wordpress Magazine Theme

ZinePress: A Wordpress Magazine Theme

ZinePress is a 2 Column widget ready Wordpress theme. This theme has very nice and beautiful layout with a way that can attract users to involve with your blog.

Remedy

remedy

This is a magazine style free wordpress theme that is widgetize on the sidebar. This theme is really good to have any media industry blog magazine.

Color Paper: A Free WordPress Theme

Color Paper: A Free WordPress Theme

Color Paper is a free professional Wordpress theme, created by the DreamTemplate team and released by SmashingMagazine. This theme aims to combine visual appeal with clean typography and vivid design elements.

Zinmag Futura

Zinmag Futura

This is a beautifully widgetized, 3 column, magazine style free wordpress theme. If you are planning to start new magazine blog or want to change existing theme of your blog, its a good theme to consider.

CreativeArt Theme

CreativeArt Theme

This is really beautiful wordpress theme works with latest WordPress release. It has Photoshop PSD Files Included and its widget ready.

Versatility

Versatility

Versatility Lite is a two column, ad-ready, widgetized theme. The theme includes a ‘Featured Post’ section, drop down CSS menus, integrated related posts, social bookmarking buttons, and much more.

Infinity: A Free Wordpress Theme

Infinity: A Free Wordpress Theme

The theme has 3 fixed columns, thumbnails integration, Flickr, Delicious and Twitter integration as well as an attractive visual design.

Deskspace Theme

Deskspace Theme

This theme works with latest WordPress release and Widget Ready. The one of the best is that it has Photoshop PSD Files Included.

Magaling

Magaling

Magaling is a premium quality Wordpress theme with Twitter status integration. Additional features include Featured Post Gallery, Feedburner Email Subscription, Popular Posts, Ajax Tabbed Sidebar, Automatic Thumbnail Resizer, Adsense ready with advertising blocks easily customizable via an Option Page.

The Original Premium News

The Original Premium News

This is a beautiful free them with featured Posts panel on the homepage using jQuery technology to display / hide the posts. It also have built-in video panel, which you can use to publish any web-based Flash videos.

Seabreeze Theme

Seabreeze Theme

This is another beautiful wordpress theme works with latest WordPress release. It has Photoshop PSD Files Included and its widget ready.

WordPress Theme Statement

WordPress Theme - Statement

The theme features a nice and clean look with two sidebars on the right and a tabbed section for recent posts, comments and archives.

29 January 2009

How to Create Colorful Abstract Artwork in Illustrator

In this tutorial, I’ll teach you how to make a colorful and vivid abstract artwork completely from scratch with Illustrator. There will be no need of stock images. You can always make a small sketch how you’d like your composition to be. But that’s not completely necessary because we will be creating the composition while playing with shapes.

Author: ViniMan

My name is Vincent Vander Cruyssen. I live in the Dutch part of Belgium (Flanders) and I'm 16 years old. Since this year I am studying Multimedia, going from learning to edit photo's to animating. I'm highly interested in music, and in creating it. You can check my stuff at deviantART, Behance, etc. with nickname ViniMan.
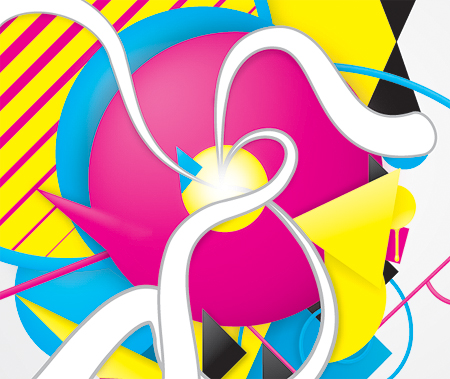
Final Image Preview

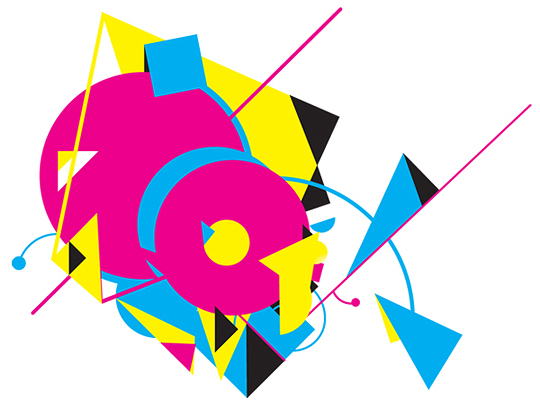
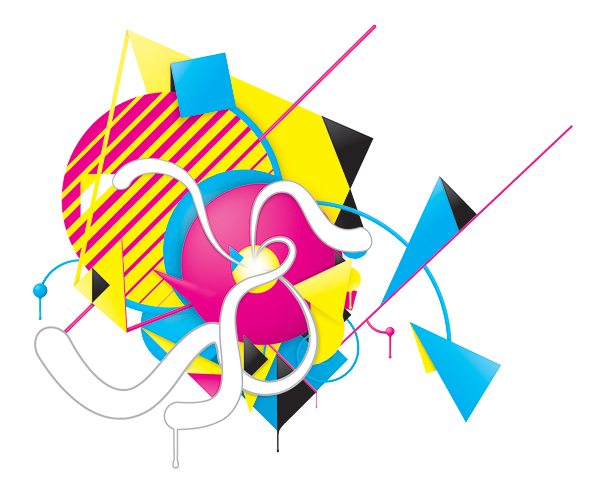
Below is the final design we will be working towards. You can view the final image preview below or view a larger version here.

Step 1

Start off by opening Adobe Illustrator, if you haven’t already. I hope you have already met most of the tools, as this tutorial is targeted at the intermediate Illustrator user.

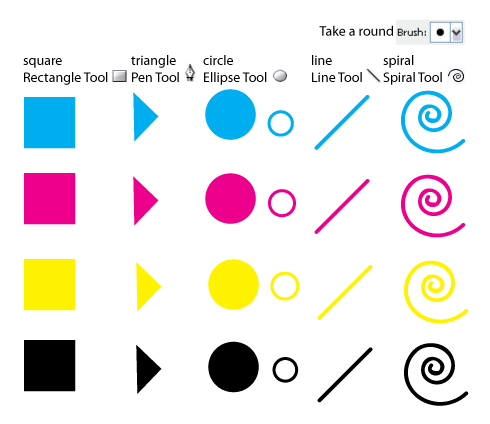
Let’s begin. Create some geometrical objects; circles, triangles, lines, spirals, etc. Place them in a fun color scheme; I picked CMYK to have a good example and because I like it. If you really have no idea, you could always take a look at the Adobe Kuler website.

Step 2

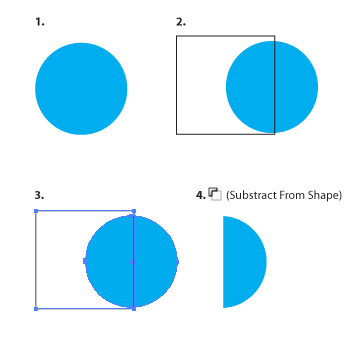
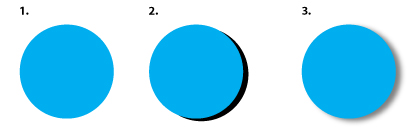
With the objects you’ve just made we will be creating our entire piece. Arrange them in a fun way, so you get a nice composition. This is something you’ve got to do with your eyes and your mind. Play with them. And don’t use every object in every color. For example for the key (black) I only used a triangle. Let yourself go. You don’t have to keep the entire objects too. As an example, I cut some circles in half using another square and the Pathfinder window, see the following:

  1. Create a circle with the Ellipse Tool, holding shift while clicking.
  2. Draw a square with Rectangle Tool and place it above the circle.
  3. Select both the square and the circle.
  4. Open up the Pathfinder window, found in Window > Pathfinder. Pick the Subtract From Shape Icon and press Expand.

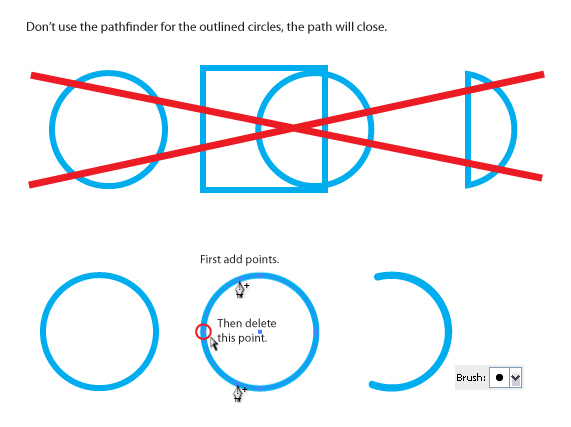
I also cut pieces away from the stroked circles. But you can’t do that with the pathfinder, because the path will close that way. The thing you’ll have to do here is add anchor points where you want the line to end and after that delete the points you don’t want to be there.

If you played enough with them you could get something like this. But please don’t create exactly the same thing, that would be really silly and you don’t learn anything by doing that. Everyone can copy paste. Work on experimenting with your composition.

Step 3

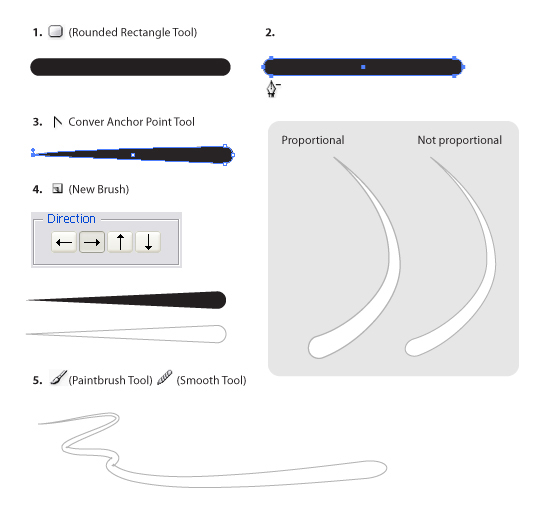
I think it needs something extra, something fun. Some swirls are always a pleasure to the eye. Let's explain one way to create them, so that you could even paint with them. Take note of the following tips:

  1. Create a Rounded Rectangle.
  2. Delete the necessary points.
  3. Hit the last point with the Convert Anchor Point Tool, found on the same place as the Pen Tool in the Toolbar.
  4. Go to the Brushes palette, Window > Brushes or hit F5, and Create a New Art Brush.
  5. When you create swirls, don’t hesitate! You’ve got to create with one smooth motion. If it’s not good looking, start over. You can always use the Smooth Tool found on the same place as the Pencil, right under the Brush tool. If you’ve got a Wacom drawing tablet, use it. It comes in very handy, because the swirls are coming right from your hand this way.

Step 4

All of the objects still have flat colors. This is in my opinion a little boring. Adding lighting and shadows – both inner and outer - will make the piece a lot more attractive. And this is something you can do in lots of different ways.

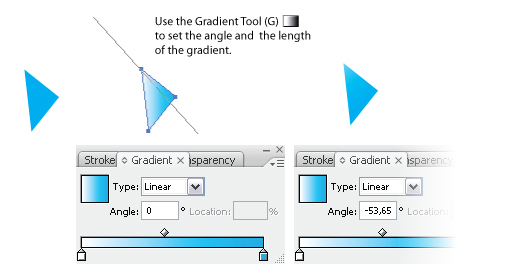
First, I’ll start with the easiest one, using a gradient on an object. Set the gradient angle and the gradient length with the Gradient Tool (G). We don’t have to search for a lighter color. Instead use a lighter tint of the objects color.

Step 5

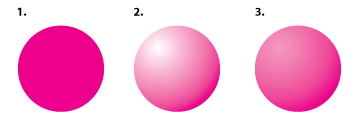
To give lighting and inner shadows to circles is nearly the same, except you duplicate the the shape, add a gradient, and lower the opacity. See the following:

  1. Create a circle.
  2. Duplicate the created circle. Add a Radial Gradient.
  3. Lower the Opacity to something around 50%.

Step 6

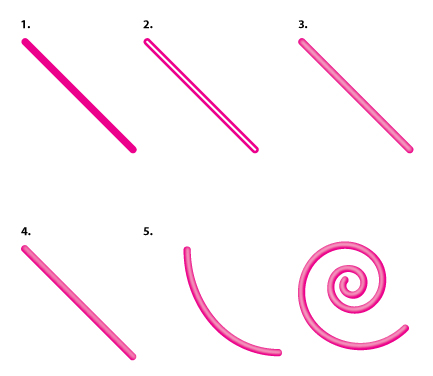
To give lines lighting you need to use a whole different method. You can work with gradients, but only if the line is straight. The gradients won’t be following the lines turnings. And the way I’ll explain is easier anyway:

  1. Draw a line with the Line Tool.
  2. Duplicate the line, put the stroke color on white and lower the stroke width to the half of what it was.
  3. Go to Effect > Blur > Gaussian Blur... The amount of pixels depends on the width of the stroke.
  4. Scale the blurred white line and move it a little up or down. Optionally you can lower the Opacity to 75%.
  5. Some additional examples shown below.

Step 7

To create even more depth between all the objects I gave some objects a little shadow, see the following:

  1. Create a circle.
  2. Duplicate the circle, give it a black fill color, place it underneath the original circle and move it a little.
  3. Go to Effect > Blur > Gaussian Blur... The amount of pixels depends on the size this time. Lower the Opacity to 50%.

Step 8

A technique to create inner shadings easily is working with masks. Just like you can do in Photoshop, nice and easy:

  1. Create a shape.
  2. Duplicate the shape and switch the fill-color to black. Go to Window > Transparency. Create a mask by clicking the empty spot next to the thumbnail of the shape twice.

  3. Draw a rectangle inside the mask and give it a black to white gradient. Click back on the thumbnail of the shape and lower the opacity.

Step 9

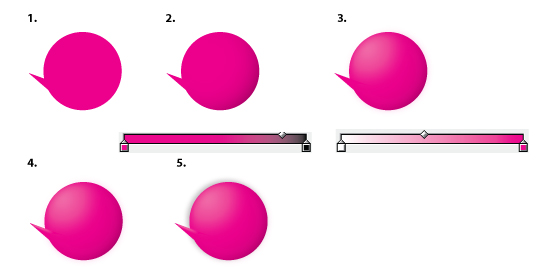
Now, we’ll add drips on places to make it more alive:

  1. Duplicate the circle, add a radial gradient and put the Opacity on 45%.
  2. Create a drip underneath the circle and give it a radial gradient coming from the top.
  3. Duplicate the drip, scale the width down and add a white gradient coming from the left with an Opacity of 40%.
  4. Create a circle for the end of the drip with a white radial gradient.

Step 10

Now you’ve seen my techniques, you could be able to do something like the image below.

Step 11

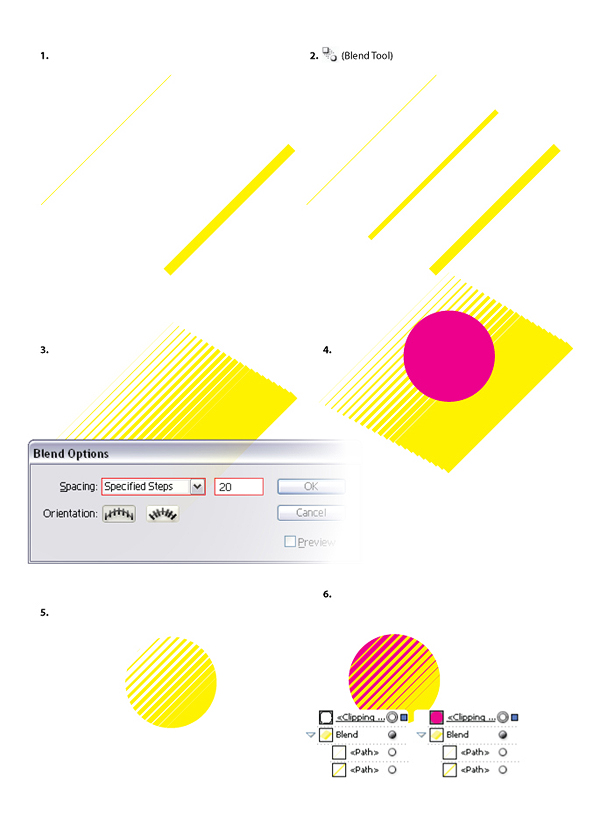
I’ll do some extra explaining on a few objects. The yellow line gradient on the magenta circle is fairly easy to create; you only need two lines with different widths, the Blend Tool and a circle.

  1. Create two lines with a different width.
  2. Use the Blend Tool.
  3. Press enter while the blended lines and the Blend Tool are selected, so that you can change the preferences. Choose Specified Steps for the Spacing, and put the number on around 20.
  4. Draw a circle on top of the blended lines.
  5. Select the circle and the Blend, go to Object > Clipping Mask > Make. Or press Command + 7.
  6. Press the Clipping Mask path and change its color.

Step 12

Here is how you need to create that magenta sphere in the middle:

  1. Create a circle and a triangle.
  2. Duplicate the circle, add a radial gradient and lower the Opacity.
  3. Duplicate the circle again, add a radial gradient, scale it down. Next, add a Gaussian Blur and lower the Opacity.
  4. Same thing with the triangle; duplicate, white gradient, scale down, add a Gaussian Blur and lower the Opacity.
  5. Add a shadow the same way I explained earlier.

If you are working with CMYK as Color Mode, you better set all the shadows of the Blend Mode to Multiply. If you aren't working for print design, and only keeping it to screen design, then you don't have to change all the shadows to Multiply. Putting the Color Mode on RGB solves it right away. Go to File > Document Color Mode > RGB Color.

I was planning on printing it so I stayed using CMYK. The reason why I had to put the Blend Modes on Multiply is because I didn't use rich black but key. Total key isn't 100% black, it's the 4th color of the CMYK spectrum. There is a rich black (a mix between Cyan, Magenta, Yellow and 100% Key) preset swatch in Illustrator, which you can use too. But it would have been even more work replacing all the Key's in the gradients with rich black. Putting the gradients and shadows with Key on Multiply does the job too, to make a more realistic black.

Step 13

Where all the swirls join together I created a white light. You can do this is almost the way same as creating a shadow. Create a white circle, do a Gaussian Blur and lower the Opacity to something around 75%. I did a black masking on the swirl where I didn't want light to be.
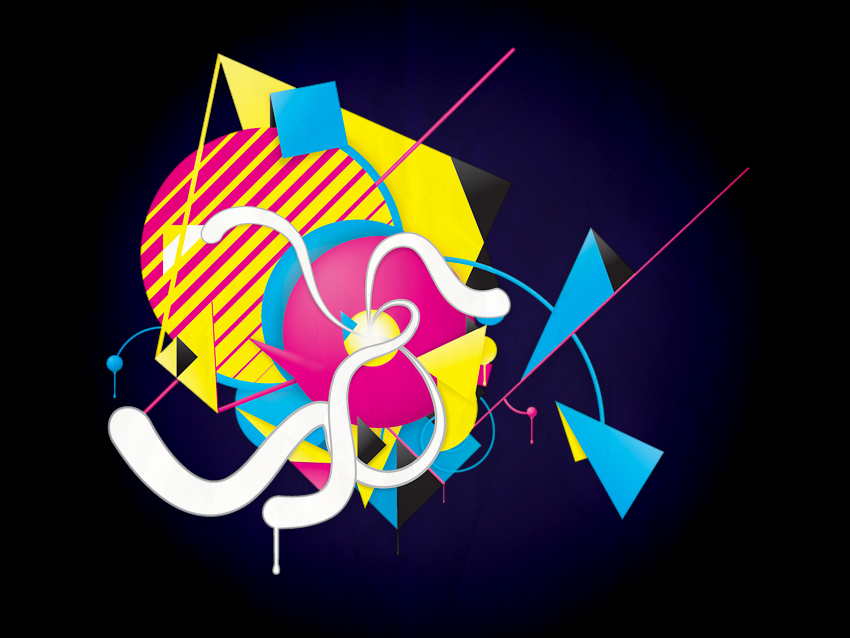
Conclusion

If you want to show your piece to the your public you could finish it up by placing it inside Photoshop, sharpening it up, using a texture and creating a background. You can view the final image below or view a larger version here.


Post comments..

Apply to be a Chitika Publisher!
Follow on Buzz